Sausalito, California

Thursday, December 27, 2012

Happy Anniversary!

Today is our 32nd Wedding Anniversary!  I saw this cardon pinterest and thought my husband would get a kick out of it.  Check out the card here . I used all punches and nestabilities circle. So cute! Happy Anniversary sweetie!

It snowed here today in Maine but it didn't 32 years ago.  I remember it was just COLD!  We had pictures taken outside and I was freezing to death because I didn't have a coat on. But the picture came out terrific! It was taken by my maid of honor, Mary Banks.  I think she did a better job than the wedding photographer. 

Petersens
We were a little crazy to get married at this time of year but the church was still decorated for Christmas and it was beautiful! and we headed to Bermuda for the honeymoon!  Thanks for stopping by!

Tuesday, December 25, 2012

Christmas Day

A closer look
Many elfs hard at work
These are the cute place tags that my sisters and I made for the Christmas table this year.  I have made the punch art elf head before for a card in an older posts here on my blog and thought they would be a cute place tag to make with the  3 small candy canes glued together to hold the little elf head.  Adorable!!  We had to make 18 of them.  The punches used are ornament for the head, bird punch for the ears, build a blossom punch for the hat, and the rim of the hat is just an oval punch, punched once with white paper and then again about 1/2 - 3/4 of an inch just above the same area.   The tags are from pinterest and I just added the bow tie. The candy cane stand is from pinterest which is just 3 small candy canes glued together to form the stand.

This picture came out sideways and I am not sure why.  But we also made these for a silverware holder.  This was also seen on pinterest and it is also adorable.  The red base is the pillow die from SU.  You can use either the large or wide oval punch to make the opening a little bigger.  The belt is just a black 1 1/2 inch band fit around the pillow die.  Punch out a gold or silver glitter square about 2 inches and a smaller black square to glue on top to finish the belt.  Of course, don't forget to add 2 little black circle for Santa's buttons.

Here is Gretel waiting to open her stocking from Santa!  She knows she is getting something good because she has been sniffing it all night!  Hope everyone had a wonderful Christmas!!


Monday, December 24, 2012

Twas the Night Before Christmas

Merry Christmas to everyone!  Even though we don't have snow I'm sure Santa will be able to find his way with the house all lit up!  Had a lot of fun doing it and now Christmas is here.  Hope you all have a wonderful holiday and a very Happy New Year! 

Such a pretty card with cuttlebug snowflake embossed gold background and also gold embossed Dasher
from SU.  Gold and White is a very pretty combination.  The sentiment is from SU and the tag is from Spellbinders.  Very simple but elegant!  Merry Christmas!!!


Saturday, December 22, 2012

Christmas Candle

-
Here is another card that I sent out as my Christmas card this year. The Spellbinders poinsettia is a beautiful die. I used 3 mini pearls for the center of the poinsettia. The candle is a sizzix die, embossed with cuttlebug folder.  I made my own banner for the sentiment and used  clear rock candy crackle paint to give it a little glimmer.  The Christmas DP from SU is the background paper which is really pretty!  It was a pretty easy card to do.  I want to try this again using the bird punch for the flame.  I saw this used on another card on pinterest and loved the outcome.  I love making Christmas cards!!!  More to come!

Thursday, December 20, 2012

Winter Wonderland

Christmas cards have finally been sent!  I made two different types this year for my Christmas cards.  This one is the first one and I think I sent about 15 of them to friends and relatives.  I have had "Dasher" for a while and wanted to use it this year. This is another card I saw on pinterest.  The red, white and gold just struck my eye.  Love the combination of colors for Christmas.  Lovely as a tree is done in Going Gray Ink and then I embossed Dasher with the gold embossing powder. 

It doesn't seem to show up in the picture but I outlined the trees with glue and added glitter.  So pretty! Added the bow and used my heat gun to give it a little crinkled look and behold it is done!  I wished the picture did it  a little more justice but I promise I was covered with glitter!!!  Thanks for stopping by!

Tuesday, December 18, 2012

Santa Owl

This is the first of a few cards I made this year to send out.  My coworker's daughter loves owls and I saw this card on pinterest and thought it would be a cute card for her.  The Santa owl is adorable!!  What did we do before the Stampin up owl punch!  It definitely is one of my top favorites because I have so many!!  It is pretty much self explanatory except I did use glitter for the white belly part of the owl (which is hard to see).  I used a pom pom for the top of the Santa hat.  Also the background is the cuttlebug snowflake embossing folder which is hard to see because it is white.  In the mail it goes!  Thanks for stopping by!  Hope everyone is done with their Christmas shopping! Less than a week to go now!

Monday, December 3, 2012

Twins December Birthday

Yesterday was Chris and Connie's True birthday!  We had the surprise party for them back in November but yesterday they truly turned 60!  Here are the cards that I made for them.  They both are Disney lovers so it was a toss up as to who got this card.  It is pretty straight forward with punches for Mickey's head.  I saw this one on pinterest. Sizzix's embossing folder for the background. Just a cute simple card!

I just bought this Memory Box poppy die and used it for this birthday card.  Once I glued it to the Sizzix top note, then I embossed the whole top note to give it this quilt effect.  Love this technique!  I have used it before and wanted to try it again.  Another simple little birthday card!  Thanks again for stopping by!!


Tuesday, November 13, 2012

Surprise!

This past weekend my sisters, me and my mom threw a surprise birthday party for my twin sisters!  We were able to keep it a surprise which is amazing to all of us!  Their birthdays aren't until December 2nd but we wanted to have it early because  they would be suspicious since it is the big 60!  I, honestly, have to say that Chris and Connie don't look like they are going to turn 60!  Chris and Connie are holding the two frames that I made for them which is their names spelled out with pictures of them through the years!  There was some research involved with finding the right pictures and then getting the pictures to fit in the letters! It was a challenge but fun! Love to create!!  We also gave them a gift certificate to Soakology which you will see on my previous post that my daughter works there and we both went a couple of weeks ago which was so relaxing............  I just loved it!  and I know they will too! Check out their Mickey Mouse cake!  They both are Disney lovers and Mickey is their favorite!


I made these Mickey Mouse cookies that I saw on pinterest.  I used Oreo cookies for the head, and ears.  I thought they were so cute!  Mine didn't come out as well as the ones I saw on pinterest but I had fun doing it! I thought they would get a kick out of it!  It really was a Mickey/60th birthday party. 
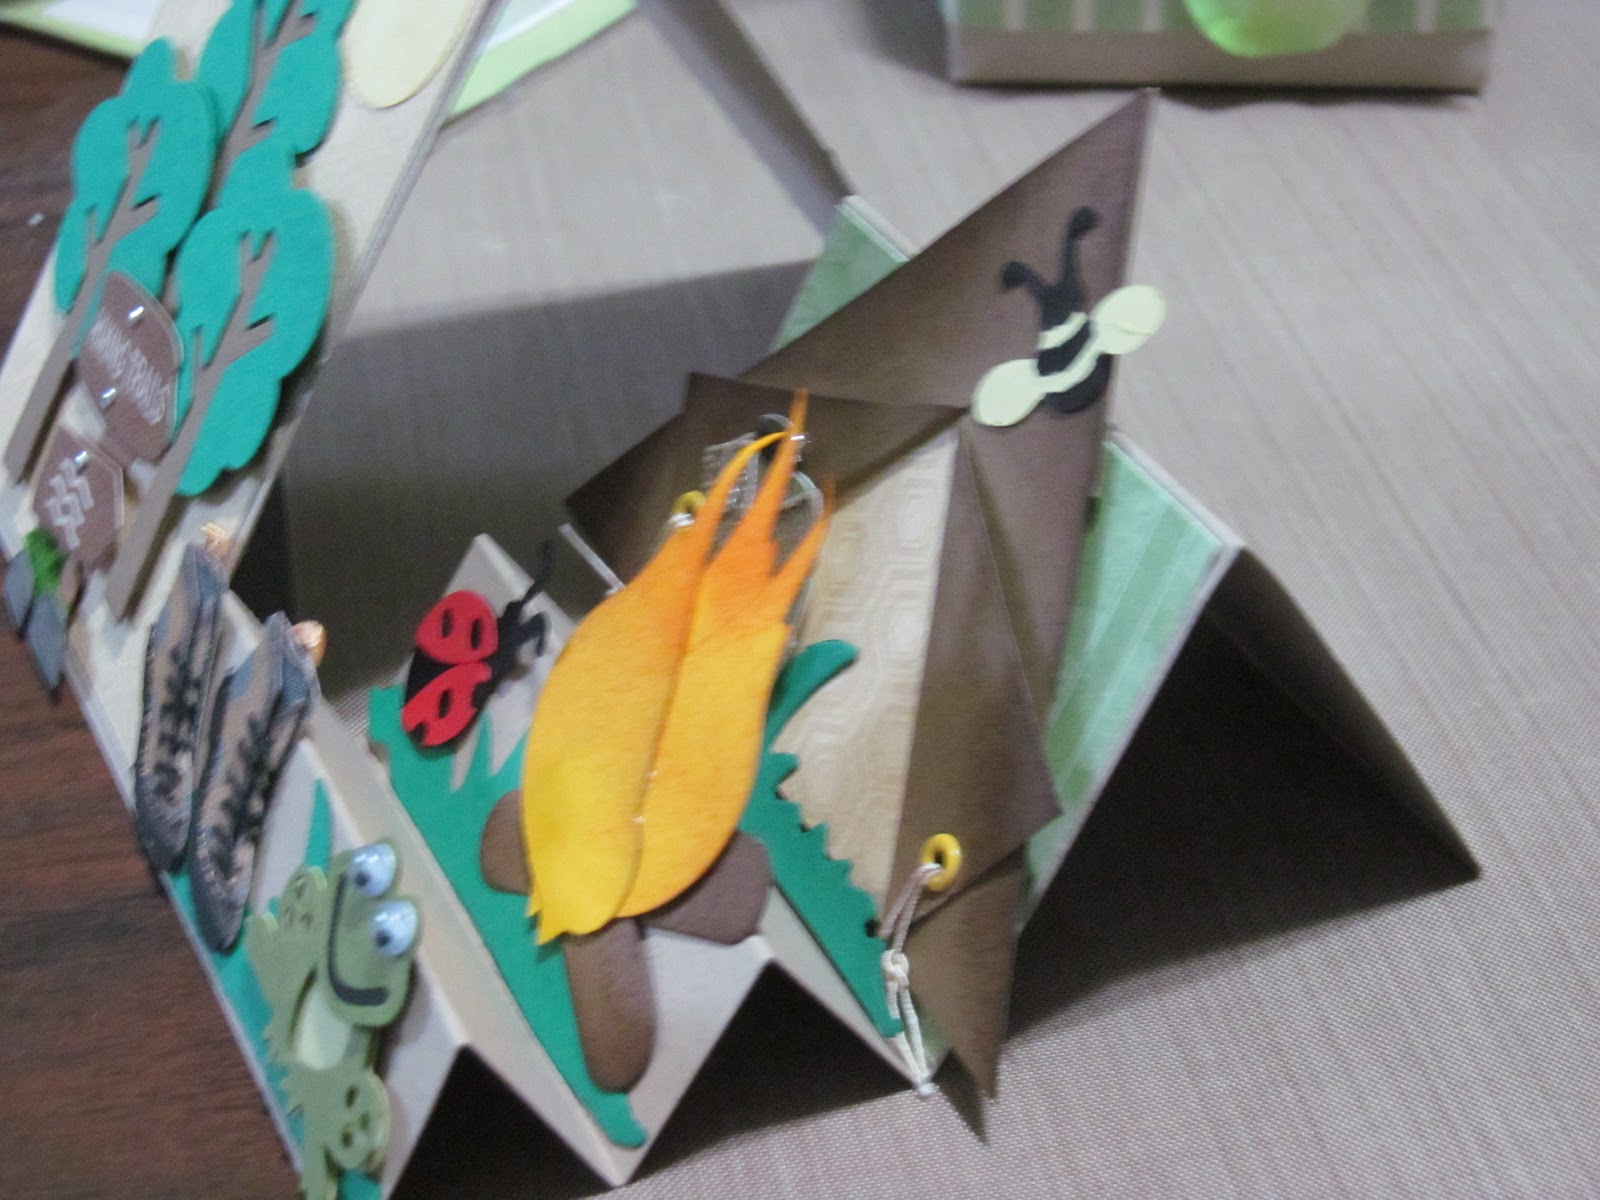
Twisted card

Here are the cards that we gave them with the gift certificates from Soakology inside.  This is called a twisted card which again I saw on pinterest and the directions for it actually is from youtube  I have more pictures of the inside of the card.

Check out a few more pictures of the party.  It was a fun, fun day!  Thanks everyone for making it a great surprise for them!!

Mickey/60th Birthday party

Adrianne and Mom

Sunday, October 28, 2012

Refurbished Project

I wanted to give this away!
At antique shops and places like Brimfield also on pinterest, I have seen these "antiqued", or distressed type of furniture. So I decided to refurbish an old entertainment center that we have had for a long time.  My husband cut the top off and I just primed and then painted an ivory color (two coats) and then sanded the corners to give it a more "distressed" look.  Then I used Miniwax dark walnut stain and stained the areas that I distressed. I didn't do the top because I am going to put a television set on in and put it in my exercise room. I felt it would get that distressed look sooner or later. Check out the pictures below to see what it looked like before and after.

Loving the "distressed" look


The top is now gone!


Thursday, October 25, 2012

Soakology.com

I have been pretty busy doing fall clean up so I haven't had a chance to upload any card but I have to share this place with you.  Soakology is heaven!  It is located in downtown Portland but what a sanctuary!  I had a soak of my feet and a head, neck and shoulder massage which could have gone on forever!!  If you like to be pampered then Soakology is the place for you.  I am definitely going to be a  regular!!! 

This is so cool!  Peaceful and  serene!! I sincerely did not want to leave! I have had trouble with my
right shoulder, just not being able to turn to the right and check for oncoming cars when I drive when I
left Soakology yesterday I was able to turn to the left and turn to the right.  Just amazing place!!

They have every tea that you can imagine!  My favorite is green tea and they had about 8 different kinds!
Love this place, can't say enough good things about it!  Check it out, you won't be sorry!

Tuesday, October 2, 2012

A Camping Birthday

My son who is an avid outdoorsman has a birthday coming up in a couple of weeks.  He is actually camping this week before he starts his new job with Mountain Hardware in California.  The side step cards is a lot of fun to make and decorate and seemed perfect for this camping/hiking birthday card. 

The tent I did free-hand just making a triangle.  I cut up the middle and folded back the flap to make the opening to the tent.  I used eyelets with string to make it look like the door was tied open.   The flame is the bird punch with the word window punch for the logs.  (Better picture below) I used sizzix for the trees, the ladybug, grass and the bee.  Jolee's dimensional stickers were used for the hiking boots, hiking trail sign and canteen. I sponged the tent, sun and flame to give more dimension. Check out some pictures below for better viewing.  I hope he likes it!!! Thanks for stopping by!

Check out that flame!
Jolee's canteen

Sunday, September 30, 2012

Birthday Rosette

Fall has arrived here in the Northeast and with all the rainy weather this weekend, I spent  a lot of time in my craftroom.  I thought I would get a jump on some birthday cards for the fall/winter season.  I am not going to specify who I am going to send this to since she may read my blog. I wanted to use Tim Holtz rosette die.  Just love how it comes out.  Looks like a spent a long time putting it together, NOT!   I haven't done the tri-fold in a long time - just love decorating this fold.  Used some punches from Stampin Up and Memory box fringe border for the pink flower that my sisters gave me for my birthday. Thank you Chris, Connie, Adrianne and Andrea - I just love it!  The DP is from SU.  Check out some more pictures of this card below. 

A closer look
My mom, sister and I met our good friend, Cindy for lunch in Cornish a couple of weeks ago and then went to a fabulous antique shop and I found a newell post.  The price was right and I thought it would look great with my wire basket (my find from Brimfield last July).  This was a unexpected find -  Thanks Connie for pointing it out to me!  It is on my deck and it won't be long before we will have to bring it in along with my wagon wheel.  I love this time of year and I actually don't mind the first couple of winter storms but then after that I'm done!  Thanks for stopping by!


Sunday, September 16, 2012

September Wedding

My son and his girlfriend were here last week from California and they needed a card for a wedding in Vermont.   I first saw this on pinterest (my favorite website in the whole wide world) and then noticed that it is Lynn Pratt's design.  She has the most creative cards!!!  Visit Lynn Pratt's blog for the template and her directions. Just adorable!!

This is a gatefold card and I love how the bride and groom come together when it is closed.

Here are some pictures of their visit.  Lobster dinner with Lauren and Eric on Lauren's first visit to Maine.

O


Out to dinner in Portland on their first night here!  One of Eric's favorite places Street & Co!!


Monday, September 10, 2012

25th Birthday For Lindsey!

My daughter's birthday was on the 8th of September and we are celebrating tonight since she had to work. I saw this cute little purse on pinterest but there were no directions because it was a class that the person was going to have.  Just seeing the picture gave me an idea for a card for my daughter.  I made my own dimensions for the purse.  I used Stampin up design paper for the entire purse.  The finished measurements are 5" x 14".  I scored at 4 1/2",6",7 1/2"  Because most papers only come in the 12" at the most.  I cut another piece of cardstock  which measures 5" x 6 1/2".  I just overlapped it to the back and it gave me 2 more inches.   I scored this piece at the 2 inch mark.  This was the top part of the purse (where the flower is pictured). I used velcro dots for the closure of the purse and you are now all set to just decorate the inside which is pictured below.

  
I can't believe this little girl is all grown up!! Thanks for stopping by!

Monday, August 20, 2012

Lauren's Birthday

August is certainly a month in our family for birthdays!!  My son's girlfriend has a birthday on August 25th and I need to get his in the mail pronto because they live in California and it takes a while to get there.  Eric and Lauren are headed to Maine in September.  Lauren has never been here.  Their first request is a lobster dinner which we will definitely have.  Check out Lynn Pratt's blog for all the punches that she used.  I love the way she made the claws, very creative!  This is one giant lobster!  Great for a scrapbooking page. The lemons are from SU Tart and Tangy set. I thought this was a perfect card to represent the State of Maine.
This is the inside of the card.  I used MS punch for the crab and sizzix for the shells, fence and seagull.  "Shore" hope she likes it!   Thanks for stopping by! 

Friday, August 17, 2012

Get Well Soon Aunt Nan

My husband's aunt fell recently and broke her hip and now she is recovering in a rehab facility in Sun City, Florida where she lives.  She is 94 years old and is doing very well.  We were a little worried at first but she is making a great recovery especially for her age. Of note, just before she turned 94 in March she jumped out of an airplane!!  Tandem skydiving and I won't do it  at any age!  Amazing lady!  Anyhow I saw this card on pinterest as a birthday card and I  thought it would make a great "Get Well" card.  The paper is Bo Bunny and SU. The tulips are made from SU's bird punch. I used nestabilities for the sentiment and background for the tulips. Sponged a little Pixie Pink around the tulips so they would be a little more vivid. Love this card!  Thanks Pinterest!! What a great website! Thanks for stopping by! Have a great weekend!

Monday, August 13, 2012

Happy Birthday to Me!

My birthday was August 11th and my sisters gave me a cupcake party! I wanted to share some pictures of the gifts and cards that I received!  It is always great to get together with family. We even got to watch "The Lorax".  Fun film!!!

We decorated the cupcakes ourselves!
Love my new spinner!
Krista's in Cornish, Maine
To make the day complete, I had dinner at Krista's in Cornish with my good friend, Jan!  She picked a perfect place to celebrate.  We ate outside under the umbrellas.  It was a terrific meal!  Need to hurry back to this place for sure.  Check out our meals.  Thanks to all who made my day a happy birthday for sure!!!

Haddock with pistachio crust
Broiled scallops